Set up a carrier
Before they can be used, carriers must be enabled for use and made visible to users. This is done in the Administration App. Most carriers can be setup manually through the Carriers page. This topic covers manual setup in general terms and should be used together with the specific carrier's reference topic which includes its key setup detail. Some carriers have dedicated setup topics, and selected carriers can also be onboarded using the wizard detailed in Setup My Carriers.
Each carrier's reference topic outlines supported functions, services and outputs. See Carriers for a list of supported carriers and links to their reference topics (and, if available, dedicated setup topics).
The first-level bullets show the typical setup stages. Indented bullets show possible or optional steps within a stage.
- Ensure your system is set up for use (manually, or use Setup My System). At a minimum you'll need Location, User and Printer (if you want to print outputs).
- Meet the carrier's requirements.
- Enable the carrier in the Administration App (all remaining setup is done in the Administration App).
- Add or request Security Credentials.
- Add the Account.
- Add Shipping Keys.
- Add Carrier Permissions.
- Set up Outputs.
Each of these stages is outlined below. Each carrier's reference topic provides specific information and, if required, points out any significant details or requirements for that carrier.
Requirements
Each carrier has requirements that must be met or understood before it can be enabled in the Administration App. Typically, accounts must exist, and you may require shipping keys or security credentials. Each carrier's reference topic lists these requirements, and generally, if there is a requirement, it means that the relevant step applies to you.
Enable the carrier
- In the Administration App, click Carriers.
- In the list of carriers, double-click the carrier.
- Select Enable, and ensure Display in Carrier Selection Controls is selected.
- If required, add or request Security Credentials. The Security Credentials tab is tailored for the selected carrier.
- Click SAVE & CLOSE.
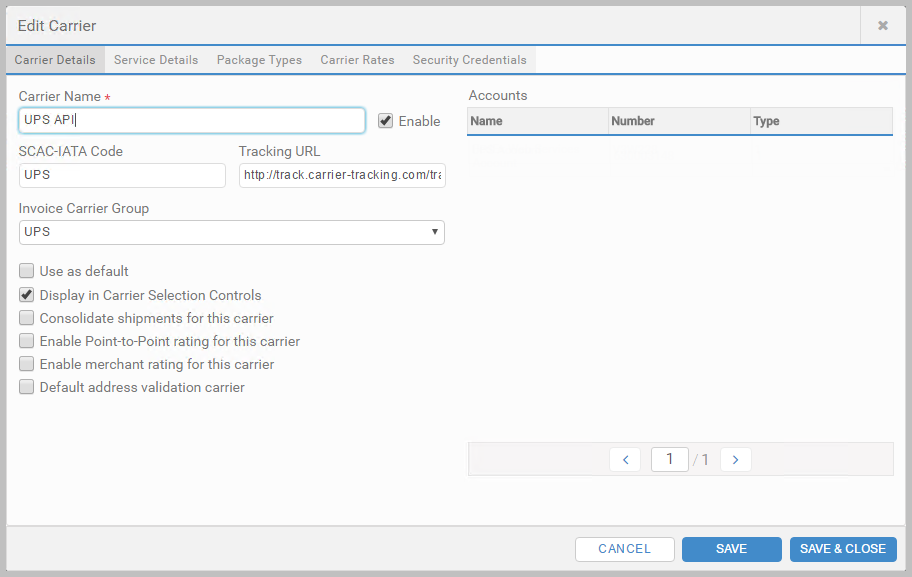
See Carriers for more details on this page in the Administration App.
Add the Account
- In the Administration App, click Carriers, and then click Accounts.
- Click + ADD ACCOUNT.
- Enter an Account Name.
- Enter your Account Number.
- In the Carrier list, select the carrier.
- If required, under Shipping Keys for Account, complete the detail, and click ADD NEW. If successful, a row is added. Click SAVE & CLOSE.
See Carriers for more details on this page in the Administration App.
Add Carrier Permissions
- In the Administration App, click Carriers, and then click Carrier Permissions.
- Click + ADD CARRIER PERMISSION.
- In the Carrier list, select the carrier.
- In the Security Credentials, Shipping Key and Account lists, select any you added for the carrier.
- Under Permissions, select who can use this carrier and account, and click SAVE & CLOSE.
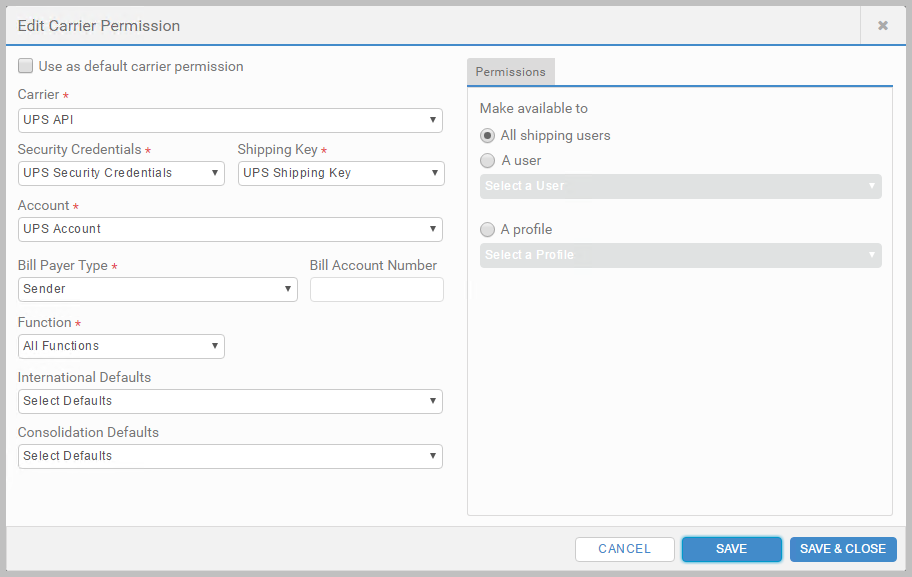
See Carrier Permissions for more details.
Set up Outputs
- Click Outputs, and then Labels or Documents, and select + ADD LABEL or + ADD DOCUMENT.
- Complete the configuration based on the detail in the carrier's reference topic, and click SAVE & CLOSE.
See Outputs for more details on this page in the Administration App.
- Carriers lists supported carriers and gives links to their reference topics.