Import data from Shipment Server
If you have an existing Shipment Server installation, you can populate an instance's Logistics Server with data from that Shipment Server. This can be done for both on premise and cloud installs. See Shipment Server Import Detail for information on which database tables are migrated and how the process is handled.
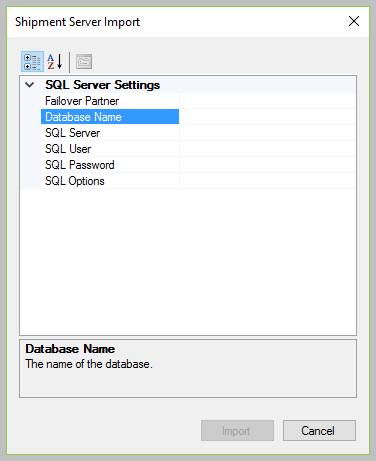
- In Transtream Setup, right-click the Transtream instance, and select Import Data from Shipment Server.
- Supply database connection details for the Shipment Server, and click Import.
Note
- In relation to carrier specific data, this only imports to those carriers supported and available in Logistics Server.
- Further, if you are installing an instance that requires carriers that are not currently supported in Shipment Server (for example, Cerasis and P44), do so in this order: install Transtream and onboard the carriers you have in Shipment Server, then use Import Data from Shipment Server, and then add the additional (non Shipment Server) carrier components (see Add Carrier Components).
- Importing from Shipment Server and then changing Compliance Engine can leave you with mismatched settings. This is not a scenario we recommend or envisage in practice. However, if you are considering such switching, we advise you to have backups of the databases involved.
Import custom carriers
The database includes complementary base data, Generic LTL and Generic Pass Through that allows for importing custom carriers that you have created through Shipment Server. Once imported, the carriers are ready to be used in any shipping App.
ConnectShip custom carriers
To import ConnectShip custom carriers, first add the Generic ConnectShip Carrier component through the Transtream instance. See Add Carrier Component. Once added, import your custom ConnectShip carriers, and use them in any shipping App.