Use a data source join
This content relates to the data source Join feature and the Table control. Using these, you can create a data source that extracts a one-to-many relationship, and displays that in a table. For example, a typical scenario is order header to order detail, where a single order number is associated with one or more lines of detail (an ‘order header 1:1M order detail’ relationship).
Note
For this to work, the underlying data structure must support the join you want to make. For example, if the tables are order header and order detail, and you want to join an order number, order number must be in both tables.
Configure a join in a data source
- In the Data Sources box, create the data source, and then:
- Add the tables that you want to join. We will term these the header and detail tables with a one-to-many relationship.
- In each table, add the columns that you need. Make sure that both tables include the columns that will form the join. We will term this column ID.
- In the header table, select the ID column.
- Click Join.
- In the box type:
dataSource.detail.ID
replacing each of the three parts to identify the ID column in the detail table. Type ahead will help you find the correct column.
- Click Apply.
This creates the join between the header and detail tables. When you use this join, searching on header ID will return all the detail rows with that ID.
Use a join in a Table control
This assumes you are carrying on from the preceding section.
- Add a Table control.
- In the Table control’s Properties, click
 next
to Table Columns and then, in the Edit Table popup, click
Manage Lookups.
Here we just need one lookup. However, tables can be associated with more than one lookup. For details, see Use lookups with tables.
next
to Table Columns and then, in the Edit Table popup, click
Manage Lookups.
Here we just need one lookup. However, tables can be associated with more than one lookup. For details, see Use lookups with tables. - In the Manage Lookups popup set:
- Lookup to a name (this identifies the lookup in the Edit Table popup).
- Source Name to dataSource
- Database Column to dataSource.header.ID (the column with the join)
- Trigger to the Textbox control
that will populate the table. For example, an Order Number search control.
Setting the Default value property in a Textbox control will not trigger the lookup at runtime. The table will only populate when you enter a value in the control and hit Enter.
- Click OK to go back to the Edit Table popup. It will now show the name of the lookup you have just added.
- In the Edit Table popup, add the columns that you want to appear in the table. Because the table's lookup uses the join, the Database column column will now list the columns made available by the join (and you can use type ahead).
Example
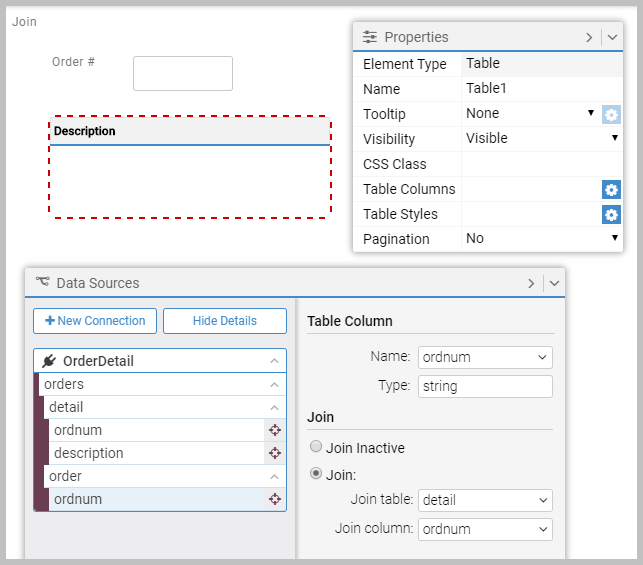
Here are some images from a very basic example. The first shows the data source and the table with the join:
The lookup showing the join:

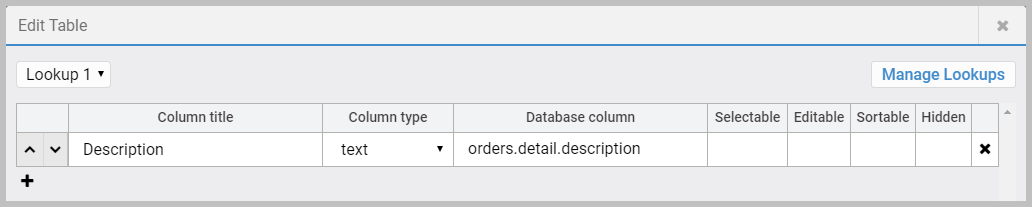
The column setting showing that it displays a column from the joined table:
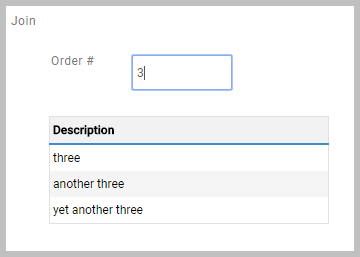
At runtime when 3 has been entered in the trigger control:
And finally, the same query executed in SQL Server Management studio: