Bulk lists
A bulk list is an organized list of contacts, and can be utilized to send the same shipment to multiple recipients. This is useful if you dispatch shipments from a single sender to an established list of recipients. For example, this could be a magazine dispatched to all subscribers, or product samples sent to everyone in Sales. Bulk lists are processed automatically, saving time spent on sending individual shipments.
Create a bulk list
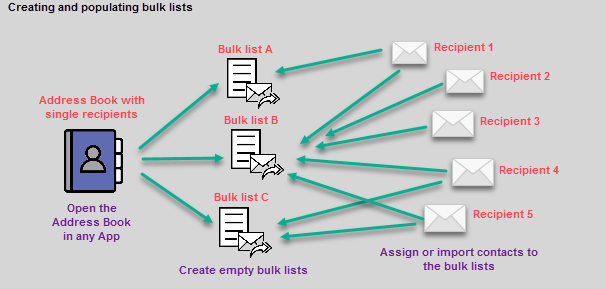
Once a bulk list is created, you can assign existing contacts to the list, or import new ones.
Overview
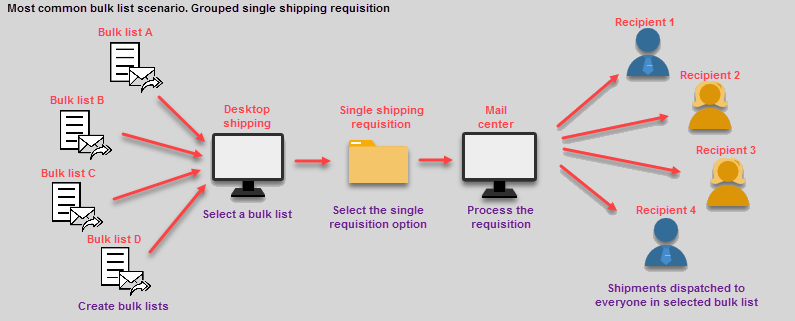
- Set up your shipment as usual, i.e. provide carrier and package detail, choose a service, etc.
- Instead of adding a single recipient, access the Address Book, and select the relevant bulk list.
- Decide whether you want to create separate shipping requisitions for each recipient in the bulk list, or whether you wish to group them in one requisition. In the scenario diagram, it assumes your Mail center prefers to process them in one requisition.
On processing the requisition(s), a separate label with unique tracking number is generated for each recipient in the bulk list but a rate is not selected in the Desktop App.
How a bulk list rate is selected
Bulk lists don't let you choose a rate. The App selects the rate that will best ensure a package arrives by its estimated date. For packages without estimated arrivals, using bulk lists will not be cost effective as certain shipping options will be filtered out.Process
TopUse  to access the Address Book from any supported App (E.g. Desktop, MailCenter, Warehouse). The Address Book is a shared resource across Apps where you can create and manage bulk lists.
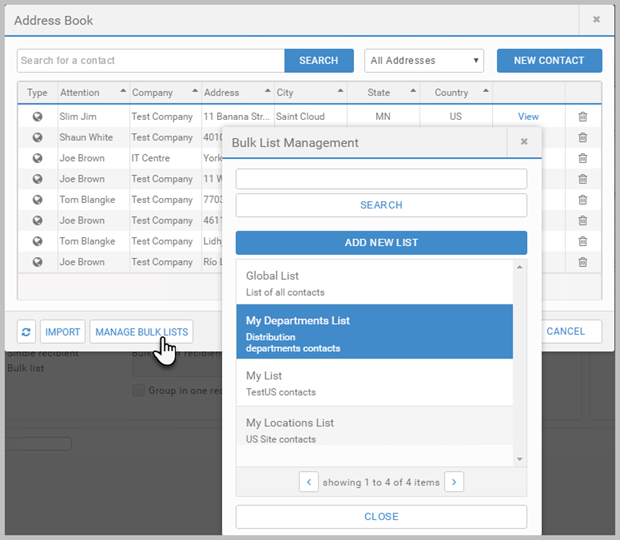
- Open the Address Book, and click MANAGE BULK LISTS. This opens the Bulk List Management popup where you can add, and edit or delete bulk lists.
- If you want to edit an existing bulk list, click that bulk list. This takes you to the next screen with the bulk list details that you now can edit.
- If you want to create a new bulk list, click ADD NEW LIST. This takes you to the next screen where you can populate the bulk list details. Once you confirm your action, the bulk list is added to the list.
- If you want to delete the existing bulk list, click that bulk list. This takes you to the next screen; click DELETE, and confirm your action.
- If you want to add a contact to the bulk list, find the contact in the Address Book, and select View. Under Bulklist membership select the bulk list to which you wish to add the contact.
- If you want to import contacts into a bulk list, select the IMPORT icon on the main screen of the Address Book. Select the import option, and choose the file. Select the bulk list you wish to import into from the List type dropdown.
MailCenter App
Use the MailCenter App to process bulk list shipments.
- In the Ship To tab, use the slider to to select Bulk List.
- Under Bulk List of Recipients, select the relevant bulk list.
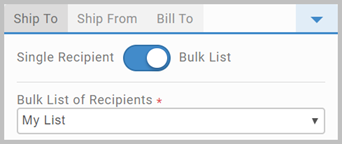
- Process the remainder of the shipment, and select the SHIP button.
Additionally, use the MailCenter App to process a bulk list requisition created in the Desktop App. To process a bulk list requisition, load the requisition, and select the SHIP BULK REQUISITION icon to commence the shipping and rating process.
A popup screen indicates that the App is processing the shipment, during which everything is disabled until the process is completed. This includes the MailCenter App selecting the best rate for the shipment. If a specific arrival date has been requested, the App will select the rate that best ensures the package arrives on time. If there is no specified arrival date, the MailCenter App will still process the bulk list in the same way, however some shipping options may be filtered out if they cannot guarantee arrival dates. Once processed, the Bulk List Processor popup will show you the status of each shipment.
- Address Book outlines the address book functionality.